

Flaming the R-Series Headlamp

Step 1. Scuff the plastic completely with a scuff pad. Use a straight razor to cut off any plastic hairs or nubs that you find. Clean with soap and water or degreaser such as HiTech.
Step 2. Apply Bulldog Adhesion Promoter and let it tack up for the recommended time. This is critical to creating a good bond between the plastic and primer. If you don’t use it, the primer and paint will flake or slide off the plastic--and this will make you feel very sad. Oh nos! Use the adhesion promoter!
Step 3. Apply SEM Flex Primer. This primer is designed for flexible parts like plastic.
Step 4. Sand the primer to your liking. 600 – 800 grit is fine. You can wet sand for a super smooth surface. For small parts, sanding in the sink under a low pressure stream of water is an easy method. You may find plastic nubs or deformities that you missed before. You can cut them off and add another layer of primer and sand it down.

Step 5. Add your paint. We stock specialty paints made by Spray.Bike and Roth Flake. Spray.Bike paints are dry powder fall and designed for bikes. These include the amazing Keirin metal and glass bead flakes in a high pressure 200ml can. Roth Flake is the California-based world renowned standard in flake paints for kustom culture. We stock their all-in-one flake and pearl paints and their multi-part classic flake sets. We also offer an exclusive Super Galactic Black Pearl paint designed by Roth to match the Super 73 Galaxy Black S-2 paint.
Step 6. Add clear coat. Spray Max 2k Clear Coat is the best and that’s what we sell. We stock the high gloss (glamour), satin, and matte. The gloss really brings out the colors and flake is not done until you've added 5 - 7 layers of gloss. This will also protect your paint job and be polishable.
Step 7. Polish. You may choose to polish the clear coat after it has fully cured for at least a day. Use 1500, then 3000 grit sandpaper, and then a finishing compound and then buff it. For small parts, you may choose to skip this process if you are okay with a little “orange peel” in the clear coat. For our old school flame headlamp plate, we skipped the polishing and it doesn’t look too bad. Maybe we’ll polish it later.
Note that this easy process is the same that you would use on your plastic fenders!
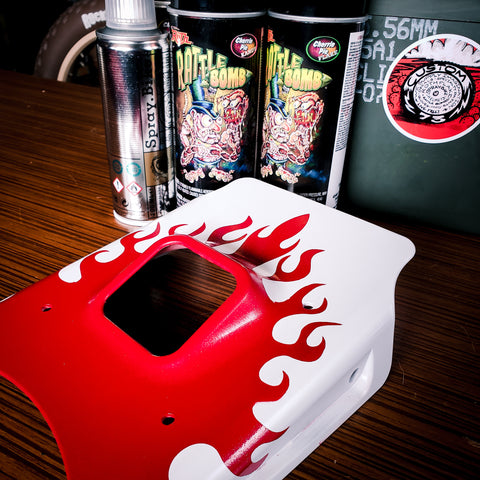
Flaming Headlamp Project.
For our flame headlamp, we cut a stencil with a vinyl cutter. For this curved surface, it was still necessary to use masking tape in some parts. We simply used the stencil to trace the flame design and wide green masking tape, cut the outline with an Exacto, and then laid it on the surface to paint. We used the Roth Avalanche White Basecoat and Roth Cherry Pie Flake, Cherry Pie Base, Cherry Pie Kandy, and a combination of Roth Cherry Pie Flake and Spray.Bike Keirin silver flake. We used less than half a can of each of these.


There were a couple of places where the white got smudged that needed a little touch up. We let the paint dry, then we re-masked using paper and masking tape to cover what we did not want to paint.

When it was all done, we added several layers of high gloss clear coat. It is the clear coat that makes the paints and flakes go Kaboom! It really brings everything to brilliant life!

Now it's your turn! What do you want to do to your face plate? Add racing numbers? A retro color gradient? Classic stripes? Flaming lips? We cannot wait to see!